Surviving When the Gods Play
By Steve Isaac (aka Chief)
We play in the ocean at the mercy of forces beyond our
comprehension. One minute we are enjoying a calm passage and the next
thing we know a cold front catches us unaware from the rear. It has
happened to me when I should have kept a better eye on my "six," and it
can happen to you too when the Gods play their game of chance. Anyone can
get blown out to sea. Anyone can get stranded. Anyone can get
lost. Anyone can get separated from their boat. And anyone can get
hypothermic. What it boils down to is that anyone can get themselves into
a world of hurt. You need to be prepared any time you take off in your
kayak.
A study of 229 search-and-rescue cases conducted by William G.
Syrotuck found that almost 3/4 of those who died (11%) succumbed within 48
hours. Usually the cause of death was hypothermia. Hypothermia is a
killer that is constantly waiting for the least little mishap so it can claim
your life.
In the last WaterTribe Okefenokee Challenge, December 2001, about
half of the nine paddlers had symptoms to varying degrees of hypothermia.
At least one Challenger was forced to stop so he could build a fire. The
fire ribbon that he carried and his knowledge saved his life.
Prevention is relatively easy. Stay warm and dry and you
won't have any problems. But staying warm and dry while paddling a
kayak, even in Florida, isn't as easy as it sounds. You must be prepared to
deal with normal precautions and life threatening situations.
To avoid hypothermia in the first place stay well hydrated and eat
regularly. Put on extra layers of protection as needed during your
paddle. Always add protection about an hour before the sun goes
down. Always have one set of cloths that you never, ever wear while
paddling. As soon as you hit the beach strip off any wet cloths and get
into your dry set.
If you are forced out of your boat, get back in as quickly as
possible. Pump the boat dry and add layers of protection. Drink hot
beverages from your thermos and take stock. If you feel good and warm,
then keep going. But if you feel the least bit cold or shivering, head
for shore immediately and take preventive action. It's time to break out
your Hypothermia Survival Kit.
This kit assumes that you are solo and there is nobody to help
you. You are already hypothermic and you are shivering almost
uncontrollably. Shaving a fuzz stick and building the perfect fire takes
too long and requires too much dexterity. You need self help fast.
Here is what you need to survive.
|
Absolutely Must Have |
Really Helps to Have |
Very Nice to Have |
Hypothermia Kit
-
Modified space blanket
-
Candle lantern
-
3 PowerGels or Stingers
-
3 Chemical heat packs
-
Hurricane matches
-
Fire starters or Fire Ribbon
See how to modify a space blanket.
|
Emergency Shelter
-
Poncho (get the silicon impregnated kind)
-
Ranger Rick
modified poncho liner
-
Mylar/aluminum sleeping bag
-
Bundle of Fatwood
|
If you still have your boat, you should
be able to add:
-
Dry long johns
-
Dry second layer
-
Outer layer
-
Dry hat
-
Hot beverage
-
Food
You won't be using this stuff until your shivering subsides and you have the
dexterity to operate normally.
|
Here is what to do if you are over the edge and cannot function
normally:
-
Take off your PFD and sprayskirt. Remove your hypothermia kit
and keep all items close by. You may also need your knife. The PFD
can be used as a seat cushion if you want.
-
Squeeze excess water out of your paddling clothes.
-
Put the modified space blanket on over your wet clothing.
-
If you have your poncho liner, put it on over the space blanket.
-
If you have your poncho, put it on over the poncho liner.
-
You have now created a three layer warming hut: vapor barrier and
reflector, dry insulation, and wind/rain cover. In many cases this is all
you will need and you will start to warm up immediately. If you only have
the space blanket, you are still going to recover.
-
Sit down behind the best wind break you can find. Form a sort
of tipi around yourself.
-
Eat a PowerGel or stinger and drink water if you have it. Eat
a PowerGel or stinger pack every 15-20 minutes until you have consumed all
three. Only after eating all three should you eat any other food.
It's important to keep fat and protein out of your stomach for the first
hour. Consume only kindling (simple sugars) to get your inner fires
working. Only then eat regular food.
-
If you are not warming up, break out the heat packs. Place
one under each arm pit and one in the groin area. Do not place next to
bare skin.
-
FIRE HAZARD WARNING: The Mylar
space blanket, poncho liner, and poncho are highly flammable. You must be
very careful with your candle lantern not to let the lantern come in contact
with anything you are wearing. Do not become a human torch. Only
use the candle lantern if your life depends on getting an external heat source.
-
If the heat packs aren't enough, it's time to break out the candle
lantern.
-
Light the candle lantern using a hurricane match. Carefully
bring the lantern under your tipi.
-
WARNING -- Obviously be careful not to light
yourself on fire. The space blanket, poncho liner and poncho are
extremely flammable. A candle lantern should keep the flame
contained. But only you can make sure that the materials you are wearing
don't catch on fire.
-
Keep your head outside the enclosed space so you don't asphyxiate
yourself.
-
Allow some venting around your neck so moisture can escape.
-
When your shivering has subsided enough, you may want to build a
bigger fire and change into dry clothing if you have any. Use your
wearable tipi as a changing room.
-
Make forays into the edge of the woods to collect dead wood,
leaves, pine needles, etc. Gather the material by the arm full and dump
it near some natural shelter area like a tree, log, rock, etc. Repeat
this procedure until you have four times the wood and kindling you think you
need.
-
Use your Fatwood and fire starters to make your fire starting
pile. Light it with your Hurricane matches. Build up the fire as
needed. Be sure not to light the woods on fire.
-
Instead of a huge bonfire make a small fire with a natural
reflector wall or object behind it. Once the fire is going well you may want to
remove your poncho and convert it back to a blanket or a shelter. You
have a natural reflector on the far side of the fire and the blanket/shelter
reflector of the Mylar/aluminum space blanket on your side of the fire.
You should be toasty warm and even able to dry your cloths.
-
Don't set yourself or the woods on fire.
-
By this time you should try to eat something if you can.
Drink hot fluids if you can, but any fluid helps.
Even if you have your boat and your normal tent and sleeping bag,
you may not have the dexterity to set it up. Your emergency shelter takes
almost no time or dexterity and gives you immediate shelter. Once you
have recovered sufficiently you can change clothes and setup a normal camp if
you have your boat.
Now What
We have prevented or recovered from hypothermia so now what.
If we have our boat, no problemo, but what if we don't. We're stranded
and we might be lost. We're hungry, we're thirsty, we need shelter so we
don't get hypothermic again, and by the way can we figure out how to get back
to civilization?
We need just a few items to survive long enough to find our way
back or wait for rescue. Add another few items and we can live in
relative comfort. This is when the traditional survival kit comes in
handy.
|
Commercial Survival Kits
Checkout Randall's Jungle
Training for the these kits.
|
|
Randall Mini
Survival Kit
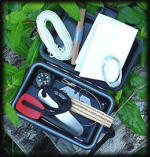
Waterproof Case
-
Otter Box
-
4.5"x3"x1.375"
-
Long paracord lanyard
|
Randall Jungle
Survival Kit
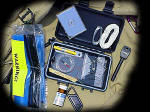
Waterproof Case
-
Otter Box
-
6.5"x3.75"x1.625"
-
Short lanyard
|
Randall Adventure
Survival Kit
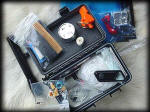
Waterproof Case
-
Otter Box
-
6.5"x4"x3.25"
-
Short lanyard
|
Tools
-
Button compass
-
Paper and pencil
-
Razor blade
-
Large needle
-
2 Safety pins
-
Rubber band
|
Tools
-
Suunto base
plate compass
-
Paper and pencil
-
Razor blade
-
Large needle
-
2 Safety pins
-
Rubber band
-
Mini ASP flashlight
-
Red paracord
|
Tools
-
Suunto base plate compass
-
Paper and pencil
-
Razor blade
-
Large needle
-
2 Safety pins
-
Rubber band
-
Mini ASP flashlight
-
Red paracord
-
Mini Mag Light
+ batteries
-
Ranger pace beads
|
| Signaling
|
Signaling
-
Reflective patch
-
Signal mirror
|
Signaling
-
2 Reflective patches
-
Signal mirror
-
Whistle
|
| Shelter
|
Shelter
|
Shelter
-
20' of 9 ply waxed cord
-
Space blanket
|
Fire
-
Swedish Scout FireSteel & Striker
-
Cotton wad
-
Resin pine stick
-
Candle stub
|
Fire
-
Swedish Military FireSteel & Striker
-
Cotton wad
-
Resin pine stick
-
Candle stub
-
Bic lighter
-
Steel wool
|
Fire
-
Swedish Military FireSteel & Striker
-
Cotton wad
-
Lighter pine stick
-
Candle stub
-
Bic lighter
-
Steel wool
|
Food
-
Light gauge wire
-
Steel leader
-
Nylon line
-
2 Small hooks
-
2 Medium hooks
-
3 Split shot
|
Food
-
Light gauge wire
-
Steel leader
-
Nylon line
-
3 Small hooks
-
3 Medium hooks
-
4 Split shot
-
5 corn kernels
-
2 bullion cubes
|
Food
-
Light gauge wire
-
Steel leader
-
Nylon line
-
3 Small hooks
-
3 Medium hooks
-
4 Split shot
-
5 corn kernels
-
4 bullion cubes
-
12' x 4' gill net
|
| Water
|
Water
-
Potable Aqua tablets
-
3 Splash Caddy bags
|
Water
-
Potable Aqua tablets
-
3 Splash Caddy bags
|
First Aid
-
2 Neosporin Packs
-
2 Alcohol swabs
-
2 Bandaids
|
First Aid
-
2 Neosporin Packs
-
2 Alcohol swabs
-
2 Bandaids
|
First Aid
-
2 Neosporin Packs
-
2 Alcohol swabs
-
2 Bandaids
-
Gauze
|
| $39.95 + Shipping |
$89.95 + Shipping |
$134.95 + Shipping |
Add to this kit --
-
Knife
-
Space blanket or 2 large garbage bags
-
Purification tablets
-
collapsible canteen or Splash Caddy bags
|
Add to this kit --
-
Knife
-
Modified space blanket or 2 large garbage bags
|
Add to this kit --
|
| Don't forget to provide spare glasses if you need
them. Make sure your kit includes any medication necessary for periodic
use.
|
|
Checkout Randall's
Jungle Training for the above kits.
|
Although these kits look expensive, I suggest buying one of them
anyway. If you buy it, you will have it. If you try to make it
cheaper, it is one of those tasks that never seems to get done. Also, you
might be surprised at how much it costs to replicate one of these kits.
My favorite kit is the Randall Jungle model. I already have
the space blanket in my hypothermia kit and I always (err, almost always) carry
a knife and a first aid kit so I have everything I need if I lose my boat, get
injured, or get lost on a hike. The Adventurer model is too bulky to fit
in my PFD or butt pack. The Mini kit is a bit Spartan, but it has the
advantage of being really small so it works if room is a problem. The
Mini is the one I carry in my EFT Pack. Speaking of PFD and butt packs, how do
we put it all together?
Packing for Survival
If you don't have it, you can't use it. The problem with
survival kits of any type is that very often you don't have it with you when
you need it. During the last Okefenokee Challenge I found myself running
upriver to search for a challenger that may have been in trouble.
Although the challenger was OK when I found him, I could have ended up the one
who needed help. When I left the landing, I grabbed a water bottle and
nothing else. About two hours into the trip it started to sprinkle and
threatened to rain. Although it wasn't real cold, hypothermia would have
been a concern. I didn't have anything with me. I was also scaling
vertical, limestone banks up to 20 feet high. One slip and I could have
been severely injured. But again, no first aid kit. The moral of
the story is that you have to pack in such a way that being prepared comes
naturally.
The ultimate survival test for a paddler is getting separated from
your boat. Even if you tether yourself to the boat like Chris Duff did
when he circumnavigated Ireland, someday you might be forced to cut that
tether. Anyone who thinks they can never get separated from there boat is
a fool, and the Gods love a fool. So what's the plan?
-
You have to stay afloat.
-
You have to avoid in-water hypothermia.
-
You have to make it to shore.
-
You have to avoid or recover from hypothermia on shore.
-
You have to survive until rescued or you find your way out.
-
You have to signal your situation.
Basically, you have to be wearing everything that you need.
Let's assume you are wearing normal clothing and a paddling jacket. You
are not wearing a dry suit or wet suit. Since you are out of your boat,
we all hope you are wearing your PFD.
The Well Found PFD
The only thing you can count on if you get separated from your boat
is your PFD. Of course you ARE wearing your PFD -- aren't you? It
should have everything you need.
Signaling:
-
EPIRB in right breast pocket
-
3 Flares in left bottom pocket
-
Signal mirror in left bottom pocket
-
Strobe/flashlight in special strap left shoulder
-
Whistle & small compass tied on left side
Sheath knife strapped upside down on left side for a right
handed person. Be sure it has a serrated section on the blade and a line
cutter notch. Don't use a folding knife. Can you get it in and out
of the sheath easily? Is the knife absolutely secure in its sheath?
Survival Pack Attached to Back of PFD or Kept Handy:
-
Orange plastic survival bag
-
Hypothermia Kit (see details above)
-
Randall Mini or Jungle Survival Kit
-
Some water if you have room
Other Items To Consider:
-
Mini first aid kit
-
Over the counter and prescription medications
-
Spare glasses
-
Sawyer Extractor
-
Spare car key
-
Money and/or credit card
-
Medical ID for any allergies or similar info
-
ID and next of kin information in case you are dead or nearly so
|
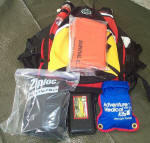
Back View Unpacked
Hypothermia kit, Randall Jungle Survival Kit, and first aid kit go into inner
pack pouch.
(I've eliminated the large first aid kit and switched to a Randall Mini Survival
Kit to reduce weight and bulk.)
Orange survival bag goes in outer pouch so it can be extracted in the
water. Why is a plastic bag in a Ziploc? By containing the folded
in air we get some flotation from an item that at best would be neutral.
Note strobe on upper left shoulder.
|
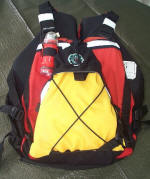
Back View Packed
It all fits but it takes some careful packing. Once everything is inside,
it looks sleek and functional.
Be sure that you don't pack it so tight that you cannot get the orange survival
bag out while in the water. Also, you want to be able to get the
hypothermia kit out easily because you might be shivering so much that normally
easy tasks take on increased difficulty.
|
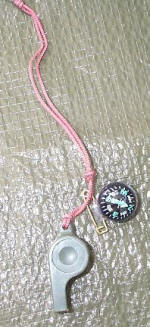
The compass is a Silva Fisheye. A spherical compass is easier to use while
floating in rough water. Precision is not necessary. You just want
to know the general direction of land.
|
|
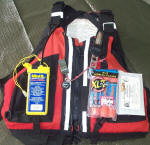
Front View Unpacked
The EPIRB is tied into the front right pocket. Flip out the antenna and
turn it on. Leave it in the pocket.
Signal mirror and 3 flares go into the left pocket. Whistle and compass
are attached on a short tether. Knife is upside down on left side since I
am right handed.
|
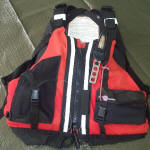
Front View Packed
With everything tucked away in a pocket it doesn't look so messy.
The Whistle and compass can be pulled out easily. The only items not
tethered is the knife itself and the flares. Keep all tethers as short as
possible.
|
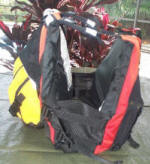
Side View Packed
As you can see the side profile isn't too bad. The backpack presents a
relatively small profile.
Make sure the backpack actually adds flotation to your PFD system.
|
| The backpack used here is a
Lotus Designs "EFT Pack." It attaches to the back of any PFD, and it can
be removed and used as a day pack. It comes with a 35 oz. hydration
bladder which I discarded. Volume is 320 cu.in. (5 litters).
Although the 500-denier Codura nylon is waterproof, the pack is not. The
only nit I have is that if a pack intended for the back of a PFD is not
waterproof, then it should have strong mesh for drainage. However, I have
the volume stuffed anyway so not much water will get caught inside the pack.
Why did I discard the bladder? It's too small for my needs, and the water
would have added weight high on my back. I prefer a larger bladder when I
use one and I place it under my seat for added stability. Although the
water would be nice to have in a survival situation, I decided that other items
had higher priority. It's a tradeoff that each person can make as they
see fit.
|
Test Your Life Support System
Be sure to test the pack that you strap onto your PFD. The
fully loaded survival pack should add at least 3-8 pounds to the buoyancy of
your PFD. Throw it in a pool after you tie 3-8 pounds of diving weights
or a bag with 3-8 pounds of sand to it. If it still floats you're ready
for further testing.
The only item in the backpack that is essential to get at while in
the water is the orange plastic survival bag. It has three functions
while in the water. First, if the water is cold, you can get inside the
bag to slow down hypothermia. Second, some say it offers some shark
protection. Third, it helps aircraft searching for you. When you
get to land, it can be used for shelter, a vapor barrier, signaling, and a
water making still.
Now test your combo to see how it floats you. If you don't
like how it works as a system, make some changes until you do like it.
Now tumble your pack and PFD. Spend an hour in a pool or
beach area working it over while wearing it. When you're too tired to
keep dunking and rolling, carefully inspect all the contents. Did you
lose anything? Are the things that need to stay dry still dry? Make
changes as needed.
Ok, one last test. Perform a self rescue while wearing your
fully loaded PFD. Did you crush anything? Were you able to re-enter
your boat. Do you need to add an assist strap to your re-entry
system? Did anything on your PFD catch on the boat?
If your system passed all these tests, you're good to go.
Acquiring the Skills
I've told you to pack the necessary equipment to build a fire
quickly, but I haven't told you how to do it. You have the tools
necessary to fish or snare some food, but how is it done? How do you
re-enter your boat? What do you do if your don't have any of the stuff
listed? Sorry, but all that is beyond the scope of this article.
You will have to do some outside reading and practice.
Fortunately, there is only one book that you must read for the
skills to survive on land. It's titled, "Tom Brown's Field Guide,
Wilderness Survival," published by Berkley Books of New York.
The most important skill to master is fire building. Using
the tools in your emergency fire kit, you should be able to start a fire within
one minute and keep it going indefinitely. That will take some
practice. Tom Brown will also explain the importance of making a
reflector on the opposite side of your fire from your shelter. This
reflector is as important as your fire. Make sure you understand that
principal.
Although there are several books that deal with self rescue for sea
kayaking, you will need in the water instruction or at least practice.
These skills look and sound easier than they are, especially in rough
water. And don't listen to the crowd that will say that paddle floats
don't work in rough water. Although there is no guarantee, they do work
if you know how to do it and you have practiced. Also, consider sponsons
as a self rescue aid. Sponsons will help you to recover from hypothermia
in your boat. You will have the stability you need to fully pump the
boat, put on extra layers of protection, drink, eat, and anything else you need
to do before going on for another 20 miles.
Take what is useful and discard the rest. When Mother Ocean
plays her tricks you might be ready.
© 2002, Steve Isaac. All Rights Reserved
|