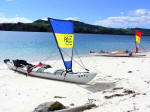
Pacific Action™ Sail
WaterTribe Class 1 Sailing to the Max
By Steve Isaac (aka Chief)
A several weeks ago I agreed to do an evaluation of the
Pacific Action™ Sail
from On Top Down Under Ltd. in New Zealand. Within just a
couple of days the sail arrived along with the first three
hurricanes to hit Florida. When I finally finished
rigging and had the Viviane out for the first time with the Pacific
Action Sail, we were already getting unstable weather from the
approach of hurricane Jeanne (our fourth of the season) so it was perfect conditions to give
the new sail a good test.
WaterTribe Class I Rules
Class I is typically the largest class in any WaterTribe
Challenge. These are Expedition Kayaks or Canoes
with a length to beam ratio less than 11 : 1. Unlike most
"round the buoys" kayak races we allow downwind sails up to one
square meter of total surface area. Since these sails must be
downwind only, we do not allow leeboards or any other device
designed to aid sailing to windward. Nor do we allow any kind
of outrigger in Class I. Of course a paddle may be used in any
manner the captain chooses.
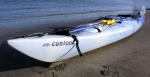
The Pacific Action™ Kayak Sailing
System Model PA_ST1 is the largest sail allowed under WaterTribe
Class 1 rules.
Rigging
Rigging the system is simple and straight forward -- except for
me. In my typical fashion I have to grok the system and
spread it out. What could be done in 30 minutes took me about
4 hours spread over two days. I do one step then stand back
and ponder for several minutes. Then do another step and so
on. I'm going to paraphrase the official instructions and make
some of my own observations.
- Each mast (there are 2) must be assembled and pinned semi permanently with a
shackle. The shackle does double duty and serves as
attachment points for the rigging. More on this later.
- You locate the forward mounting points for the mast step by
placing the assembled mast on your kayak deck about where you
would like the ends of the mast to be located when the sail is in
the down position. This will be just forward of your
cockpit. Choose either the right or left side depending on
your other equipment located on deck like compass, GPS, etc.
I put the tips on the left side. Make sure they are far
enough forward so that they don't conflict with your paddle
stroke. Also, consider your deck bungie cords and how you
will mount the small hold-down bungie included with the sail.
Note that there MUST BE A MINIMUM of 12 inches from the mast step
to the front lifting point of your kayak. Normally this
won't be a problem for a boat longer than 17 feet.
-
| When drilling holes for screws and bolts always use a
dollop of 3M4200 as a sealing compound where the bolt goes
thru the hull. It's also a good idea to put a bit of
3M4200 on the threads of nuts (even locking nuts). Be
careful because 3M4200 tends to be messy. |
Now that the mast step location has been determined it's time
to mount the two small plastic anchors for the mast step straps.
These need to be fairly high on the sides of your kayak but low
enough so there is room for the mast step. A very skinny
foredeck could have a problem with this. My Viviane worked
out OK but was right on the edge of not having enough width.
Usually these anchors will be located right about at the seam line
between the hull and deck, but each boat is different. BE
CAREFUL to make sure that once the anchors are mounted you can
easily get the buckle straps through the slots. It's easy to
mount them in such a way that it's virtually impossible to slip
the straps through the slots. Use 3M4200 for mounting the
anchors.
- Now tie the rigging line to the shackles on the aft side of
the sail. You should end up with a loop starting with a knot
at one shackle,
then a snap-hook,
then two in-line jam cleats,
then another snap-hook,
and finally ending up with the last knot at the other shackle.
Assuming you have some mounting points already on deck, connect a
snap hook on each side of your deck. If you don't already
have the mounting points, you will need to install the ones
provided with the sail. Again use 3M4200. Note: the
jam cleats never get mounted to the deck. They slide on the
control line and are only needed in special conditions.
- Now tie the forward bungie cord to the forward side of the
sail. You should have a loop starting at one shackle,
then a snap hook,
and finally a knot at the other shackle. Eventually you will
convert the second knot to a use zip ties instead but don't make
anything permanent just yet.
- Now connect the control line snap-hooks to the deck.
Pull the sail up and connect the bungie snap-hook to the forward
lifting point of your kayak. Adjust the control line loop
length so that the sail is vertical and tie it off at the shackle.
Adjust the bungie cord length so that the cord is almost
at it's maximum stretch when the sail is down. When you have
the length correct go ahead and use the cable ties to make the
loop size permanent.
- Adjust the masts so that everything is tensioned properly and
the mast steps are spread out correctly. Then tighten down
the locking nuts. Don't forget to use the four locking
screws (2 per mast) at the very base of each mast. And don't
forget the 3M4200.
- Go have a couple of beers.
- Now install the tie down as appropriate for your deck.
You want it located so that it holds the sail down under all
conditions including breaking waves on deck and numerous rolls.
 |
Now sit in your boat under a nice shade tree and play with the
sail. Notice how it pops up nicely when when you release the
tie down. POP!!! and it's up! Very cool.
But also notice how the control loop can easily get tangled if
you are not careful what you do with it when taking the sail down.
Practice setting and striking the sail several times. Now
close your eyes and practice some more. Now get your wife to
spray you with a hose while you're doing. Now add some
neighborhood kids with buckets of water. -- OK, I'm getting
carried away, but you get the point -- practice on shore first.
Now it's time to hit the water.
Sailing
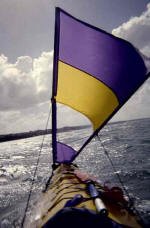 I like to use a Greenland style paddle especially when
sailing downwind. The Greenland paddle seems to make a
much better outrigger than a spoon blade in my opinion. |
Hurricane Jeanne was bearing down but still well off the east
coast. Wind on the leeward side of the Gandy Causeway was blowing 15
knots and gusting to 20 on Saturday. By Sunday only an idiot
would be out on the water. I only had a couple of hours
Saturday afternoon. By locating the kayak closer or further
from shore I could vary the force of the wind and the direction.
Perfect for a first test.
The first couple of times I popped the sail up close to shore in
relatively calm winds. After a bit of practice I paddled out
into more choppy water with higher winds. After lining up the
stern so I was pointed directly downwind I popped the sail.
The easy of setting the sail is absolutely outstanding.
The bungie launch system is really nice especially for a sail of
this size. The sail can be set without missing a paddling
stroke. But who needs to paddle anyway. I quickly hit
over 7 knots just about flying downwind. I was still
accelerating when my GPS died so I don't know my exact top speed.
Almost immediately I stopped paddling and just used my paddle for an
occasional brace or outrigger.
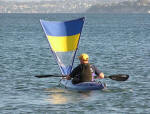 |
The next test was sailing with the wind off my stern quarter.
This was easily accomplished by rotating the sail using the control
loop while turning to port or starboard. My kayak continued to
make rapid progress but just a bit more bracing was necessary.
Nothing serious but a little more attention needed. Compared
to other (smaller) down wind sails I have used there was more
instability with the PA sail. This is due to it being located
much further forward and having more sail area. Again, it
wasn't much of a problem in these winds but if it had been 20
gusting to 25 I'd probably take the sail down.
Now it was time for testing a beam reach and upwind performance.
I'm not an idiot so I decided to do this test closer in to shore
with less wind. In order to do that I had to strike the sail
and paddle back to my launch point. Striking the sail is the
most dangerous time in my opinion. You can't just pull on one
side of the control loop. You really have to pull both sides
down at the same time and then grab the ends and stuff them under
the tie down. While doing this you have to be careful with the
control loop line so it isn't going to tangle the next time you want
to raise the sail. During this process you are vulnerable to
capsize since both hands are busy for a few seconds. Make sure
to line the boat up exactly downwind and then get it done quick.
I executed the plan without mishap and paddled back toward shore.
Once I made it to an area with less wind, I popped the sail
again. Then I pulled one side of the control line down so the
sail was sort of a cross between a jib and a small crab claw.
I was able to beam reach and even point into the wind a few degrees
but noticed a strong capsizing force and noticeable side slip.
The speed was so slow that this seems like a total waste of time and
effort. Although the claims of the manufacturer are true,
I'd think of this sail as downwind only through an arc of roughly
120 degrees or so.
Transport
The storage bag will only accept the sail if the two masts are
broken down so you have to unscrew the shackles that serve as
attachment points for the rigging. I'd prefer a storage bag
long enough to contain the assembled masts, but that's just a nit.
Since the rigging really must be assembled or broken down on shore
this doesn't present any real problem and the package is light and
small. It only takes a couple of minutes to break it down and
get everything stowed.
Final Impressions
Construction quality is excellent. Performance is really
good in light to moderate winds, but the sail is too large and hard
to control in strong winds. I don't see any reasonable way to reduce
sail area without going into shore so the only choice is to use it
or don't when the wind kicks up.
The deployment system is the genius of this sail and also it's
Achilles Heal. It's ingenious in the way the sail is nicely
tucked away on deck ready to deploy in an instant. Then it is
easy to douse and stow again when no longer needed. But the
mounting system places the deployed sail further forward on the deck
than I would normally want for a sail of this type.
All photos were contributed by On Top Down Under Ltd. since my
digital camera finally quit working due to salt water intrusion over
3 years of hard use.
Pacific Action is a New Zealand
registered trademark of On Top Down Under Ltd.
© Steve Isaac 2004
|